Saturday, August 25, 2012
The End
The Google Summer of Code 2012 came to an end. I would like to thank all Nomacs mentors for this great experience.
Thursday, August 9, 2012
Filtering image noise
Every image we shoot with a digital camera has some noise in it. Depending on the environment where we shoot the noise can be noticeable or unnoticeable. A very big component of the camera noise depends on the ISO speed. Higher the ISO value we select, more sensitive will the camera sensor be and a more noise picture we will get. The noise can be divided to color and luminance noise.
To get a prettier image we need to filter the noise out. In Nomacs RAW Loader we added median filtering of the image because it is a good method to filter noise without ruining the edges in the image. We replace every pixel in the image with the median value of the pixels within a square around the pixel we are replacing. The size of the square is called window size and it has to be an odd number. Because we only want to filter color noise we transform the RGB image to the YCrCb color space where we filter both chroma channels and then we transform back to the RGB space.
The only parameter in the median filter is the window size. Bigger the window size more time will the filtering take and also we can over filter an image. This is why we need to be careful which window size we select for each ISO value. To find them we did a small scientific research.
We put a Nikon D300 on a tripod and shoot a Colorchecker SG card 19 times. Each time we changed the ISO value that ranged from 100 to 6400. For determining the noise of a picture we calculated the peak signal to noise ratio (PSNR) . For the reference we used the image with the lower noise = ISO 100. Bottom graph shows the PSNR value to ISO value dependency. Higher is the PSNR value, lower is the noise.

We see that in general the PSNR value is decreasing with increasing the ISO value. Because the exposure is not the same in every image there is some zigzagging but the general trend is clearly visible. Lets now take a look what happens with PSNR values after median filtering with increasing the window size: 3,5,...,13:

We see that the PSNR value is increasing. But we also see that there is a limit to where the noise can be reduced. For higher ISO values we need higher window size to get there. The best way to decide the window size for each ISO is to take a look at PSNR as a function of window size. Bellow are the graphs for ISO 250 and 3200.
ISO = 250:
 ISO = 3200:

We can see that the noise is decreasing with the increase of window size but if the number is too big the noise starts to increase again. For the window size we select the value where the noise stops to improve. The results for the window size are:
ISO > 6400: winSize = 13
ISO >= 3200: winSize = 11
ISO >= 2500: winSize = 9
ISO >= 400: winSize = 7
ISO < 400: winSize = 5
To get a prettier image we need to filter the noise out. In Nomacs RAW Loader we added median filtering of the image because it is a good method to filter noise without ruining the edges in the image. We replace every pixel in the image with the median value of the pixels within a square around the pixel we are replacing. The size of the square is called window size and it has to be an odd number. Because we only want to filter color noise we transform the RGB image to the YCrCb color space where we filter both chroma channels and then we transform back to the RGB space.
The only parameter in the median filter is the window size. Bigger the window size more time will the filtering take and also we can over filter an image. This is why we need to be careful which window size we select for each ISO value. To find them we did a small scientific research.
We put a Nikon D300 on a tripod and shoot a Colorchecker SG card 19 times. Each time we changed the ISO value that ranged from 100 to 6400. For determining the noise of a picture we calculated the peak signal to noise ratio (PSNR) . For the reference we used the image with the lower noise = ISO 100. Bottom graph shows the PSNR value to ISO value dependency. Higher is the PSNR value, lower is the noise.

We see that in general the PSNR value is decreasing with increasing the ISO value. Because the exposure is not the same in every image there is some zigzagging but the general trend is clearly visible. Lets now take a look what happens with PSNR values after median filtering with increasing the window size: 3,5,...,13:

We see that the PSNR value is increasing. But we also see that there is a limit to where the noise can be reduced. For higher ISO values we need higher window size to get there. The best way to decide the window size for each ISO is to take a look at PSNR as a function of window size. Bellow are the graphs for ISO 250 and 3200.
ISO = 250:


We can see that the noise is decreasing with the increase of window size but if the number is too big the noise starts to increase again. For the window size we select the value where the noise stops to improve. The results for the window size are:
ISO > 6400: winSize = 13
ISO >= 3200: winSize = 11
ISO >= 2500: winSize = 9
ISO >= 400: winSize = 7
ISO < 400: winSize = 5
Friday, July 20, 2012
Improvement of Nomacs Raw Loader
The RAW image data we get from digital cameras are the values taken from the cameras sensor. This image is mosaiced: every pixel has just one of the three colors: red, green, blue. The pixels form a pattern that is called color filter array. The most common of them is the Bayer filter which is composed of two green pixels on one diagonal and of one red and one blue pixel on the other diagonal. Bellow picture shows a small part of the Bayer filter.

In order to create an image that represents what a human eye would see we need to process the RAW data. There are a few essential steps that we need to do:
1. Normalization of RAW data: the RAW image needs to be normalized depending on the black point of the used digital camera and its dynamic range.
2. Demosaicing: for each uni-colored pixel we need to find the other two colors of this pixels. This is done by using the interpolation that is based on the type of the color filter array.

3. White balance: The demosaiced image is very green. To remove this effect we multiply each image RGB channel with a constant. The three constants are based on the photographed scene illuminant and they differ for each digital camera.

4. Color correction: The colors of the white balanced picture are still not right. We need to do another transformation that converts colors from the camera color space to a standardized color space such as sRGB or AdobeRGB. This is done by multiplying pixels RGB values with a so called color matrix.

5. Gamma correction: the human visual response to the light is nonlinear. On the other hand the digital camera response is linear. The process of changing the linear data to nonlinear data is called applying gamma correction.

The previous version of Nomacs RAW Loader had a little different sequence of this changes and it was missing one correction: the color correction. After changing this the improvements are clearly visible. Bottom image shows the difference between previous and modified RAW Loader.

So when we postprocess a RAW image we need to be careful that we make all needed corrections. Missing one completely changes how the processed image looks.
Thursday, July 19, 2012
Hue, exposure, gamma
As promised, we will now take a look at the other three image manipulation tools that lie inside the Nomacs image manipulation dialog: hue, exposure compensation and gamma correction. The range of changes that we can make are:
Hue from -180 to 180. Step size for the bottom picture is 36.

Exposure compensation from -6 to 6. Step size for the bottom picture is 1.2.

Gamma correction from 0.01 to 9.99. The bottom picture shows changes for gamma 0.1, 0.2, 0.4, ..., 1.0, 2.0, 4.0, ..., 8.0, 9.99.

Gamma and exposure changes in the top and bottom slider range are very extreme. If we are changing 24 bit images then we also have a great loss of data. So the values in the extreme zones are not recommended unless if the images are very under or over exposed.
Thursday, July 5, 2012
New Image Mnaipulation Tools Dialog design
In the last two weeks the image manipulation tools was completely redesigned. Not only the GUI changed but also the source code changed a lot.
Let's start with the most visible thing. Sliders have a new look which makes the dialog look more professional and appealing. The difference between this and the previous look is noticeable.
To the list of manipulation tools was added the exposure control. I will present it in a separate post together with hue and gamma.

The work on the code in the past couple of weeks was mainly a research project. I was trying to find the best method to use for applying the sliders changes to the image in the main window. Because the changes made by different sliders stack on each other, the process to make them can be slow. Especially for big images.
At first the best way seemed to use 16 bit lookup tables (LUT). We create them very quickly and also we apply them very quickly on images. They are the quickest way of making changes on big images. In RGB space they can also be stacked together. We can then apply the LUT on the main image once. It sounds very promising but there is a problem. In our image manipulation dialog we can change the saturation and hue of an image. For this we need to convert the current picture from RGB to HSV space, change the Hue or Saturation value and convert back to the RGB space. Because the transformation is nonlinear the change can't be done using a lookup table in RGB space. With a simple 16 bit LUT in RGB we can't take into account all possible changes of saturation and hue in HSV space. For this we would need a 16^3 bit LUT which is too big.
The remaining solution was to use LUTs for changes on a local scale (within one slider) and to create a history of changes. When hitting the OK button we go through the history an apply all changes to the main image. This process can be slow because we need to go through image pixels for every change in history. But this is the only way to do it without losing the accuracy of the image data.
The positive side of having a history vector of the changes is that it enabled us to create the undo and redo buttons. We just need to go up or down through the history and recalculate the changes to that point.
Let's start with the most visible thing. Sliders have a new look which makes the dialog look more professional and appealing. The difference between this and the previous look is noticeable.
To the list of manipulation tools was added the exposure control. I will present it in a separate post together with hue and gamma.

The work on the code in the past couple of weeks was mainly a research project. I was trying to find the best method to use for applying the sliders changes to the image in the main window. Because the changes made by different sliders stack on each other, the process to make them can be slow. Especially for big images.
At first the best way seemed to use 16 bit lookup tables (LUT). We create them very quickly and also we apply them very quickly on images. They are the quickest way of making changes on big images. In RGB space they can also be stacked together. We can then apply the LUT on the main image once. It sounds very promising but there is a problem. In our image manipulation dialog we can change the saturation and hue of an image. For this we need to convert the current picture from RGB to HSV space, change the Hue or Saturation value and convert back to the RGB space. Because the transformation is nonlinear the change can't be done using a lookup table in RGB space. With a simple 16 bit LUT in RGB we can't take into account all possible changes of saturation and hue in HSV space. For this we would need a 16^3 bit LUT which is too big.
The remaining solution was to use LUTs for changes on a local scale (within one slider) and to create a history of changes. When hitting the OK button we go through the history an apply all changes to the main image. This process can be slow because we need to go through image pixels for every change in history. But this is the only way to do it without losing the accuracy of the image data.

The positive side of having a history vector of the changes is that it enabled us to create the undo and redo buttons. We just need to go up or down through the history and recalculate the changes to that point.
Friday, June 22, 2012
Image Mnaipulation Tools Dialog
In the previous post I showed the first three image manipulation tools that were added to Nomacs. The tools were placed in a Qt Dock Widget and a change in tools values resulted in a change of the displayed image colors. For changing the colors of an image we need to go through each of its pixels and do a calculation depending on the tools values. As we can see on the graph in the post Image histogram - speed upgrade the time needed for going through all the pixels exponentially increases with the image size. So the manipulation of larger pictures took more time and this resulted in a bad user experience.
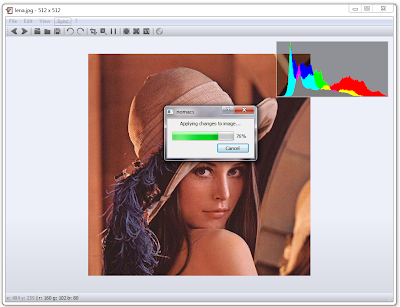
The solution was to move the tools from the main window to a dialog with a small picture preview. This way all the changes that user makes are firstly displayed on a scaled image. This is done faster then on an unscaled image. This way the changes on the slider are smooth and the preview is redisplayed right away. Only after the user is satisfied with the preview, the changes are made to the image in the main window.
The current look of the dialog is displayed bellow:

Friday, June 15, 2012
Image manipulation tools
The main goal of my first part of the Google Summer of Code program is to create image manipulation tools. I started programming them after I finished the histogram. I've added the Qt Dock Widget, which will contain different image manipulation tool widgets.
The widgets I've added so far are three sliders for changing the brightness, contrast and saturation of the opened image. The picture bellow shows the current look of the added widgets.

Let's also take a look at the changes we get with different slider values of brightness, contrast and saturation.
Brightness from -100 to 100, step 20:

Contrast from -100 to 100, step 20:

Saturation from -255 to 255, step 25.5:

Monday, June 4, 2012
Image histogram - speed upgrade
When creating an image histogram we need to go through all the pixels in the image. In larger images there can be a lot of pixels so this process can be slow if not programmed correctly.
First time I used Qt and its QImage::pixel(x, y) function to access pixels in the image. It was very slow. It took more then one second to go through an image of size 4320 by 2868. One second waiting for a histogram to show is a long time and an user certainly wouldn't be pleased with it. The alternative way is to use OpenCV and its class Mat which needed a quarter of a second. This is a pretty big difference and a big improvement in user experience.
Bellow I've created a graph showing the time in milliseconds needed for calculating a histogram of a square image. The horizontal axes shows the number of pixels in one side of the image.

We can see that using Qt gives us larger calculation times. This is why I don't recommend it for image manipulations where we need to read or modify all the pixels in the image.
Friday, June 1, 2012
Image histogram
Every beginning on a new project that is already a fully functional program is hard. There is a lot of code already written that you need to get used to and in Nomacs there is also the Qt framework that I am using for the first time. After some days of looking at the code and getting a general feel on how things work and how the code is written I started programming.
As my first coding task I wanted to do something fairly simple that would introduce me to Nomacs and Qt. I decided to create a panel with a histogram of the displayed picture. The histogram will be useful also when coding tools for image manipulation because we can compare the histogram with other programs. To create the histogram we go through each image pixel and for each channel we count the number of pixels with the same color. From the normalized calculated data we draw the histogram in a DkHistogram widget that is based on DkMetadata and DkInfoLabel widgets as it was kindly suggested by my mentors.
The final result is shown in the image bellow.

Friday, May 25, 2012
Applying to GSoC 2012
In search of new experiences, this year I decided to apply for the Google Summer of Code 2012. After the 180 selected organizations and their projects ideas were announced I started looking for an interesting project to which I could contribute. I found it between the projects at Technical University of Wien. The project name is Nomacs RAW Loader and the goal is to add tools for raw image manipulation for the open source image viewer Nomacs.
I am a physics student currently finishing my diploma. During the experiments for the diploma I've learned a lot on digital cameras, raw files and image processing. Because of this knowledge and because of the interesting topic of the project I chose Nomacs RAW Loader as the project that I would write a proposal for. The proposal with more about the project and me is accessible at http://www.google-melange.com/gsoc/proposal/review/google/gsoc2012/tjerman/1.
I succeeded with the proposal and I was selected to contribute to Nomacs as part of GSoC 2012. The coding period for the project started at the beginning of this week. What I will try to do during the next 16 weeks is adding tools to adjust raw images from how they are currently displayed (left picture) to how they are display for example in Photoshop's Camera Raw (right picture). In the weeks to come I'll be posting about the process of trying to get there.

Subscribe to:
Posts (Atom)